<small id="wg64m"></small> 
Project Introduction
In the heating or heat preservation process of steel in various hot working procedures, the phenomenon that all or part of the carbon on the steel surface is lost due to the effect of the oxidizing atmosphere is called decarburization. The depth of the decarburized layer refers to the distance from the surface of the decarburized layer to the position where the matrix of the decarburized layer cannot be distinguished from the metallographic structure.
The decarburization of the steel surface greatly reduces the hardness, tensile strength, wear resistance and fatigue limit of the steel surface. Therefore, the relevant standards for tool steel, bearing steel, spring steel, etc. have specific provisions for the decarburized layer. Important mechanical parts are not allowed to have decarburization defects. For this reason, the decarburization layer of parts must be removed during processing.
Decarburization is a surface defect of steel. For most industrial steels, especially tool steel with high carbon content, chromium ball bearing steel, spring steel and medium-carbon structural steel for some important purposes, the depth of the decarburization layer Are strictly restricted. The technical standards of various steels require inspection of the decarburization situation and make clear provisions on the allowable depth of the decarburization layer.
Guideline
GB/T 224-2008 Decarburization depth measurement method of steel
ISO 3887-2003 Determining the depth of steel decarburization layer
ASTM E1077-01 (R05) Metallographic determination of α-phase area content in stainless steel
Detection method
Decarburization layer thickness test method
Three methods for measuring the depth of the decarburized layer are included in GB/T224-1987: metallographic method, hardness method, and carbon content determination method
1. Metallographic method
The equipment is simple, the method is simple, and it is also an important method in the routine decarbonization inspection, but the measurement error is large and the value is low. To ensure the measurement accuracy, the operator should perform at least five measurements on each sample and take them. The average value is taken as the depth of the decarburized layer.
(1) Selection and preparation of samples
The inspection surface of the selected sample should be perpendicular to the longitudinal axis of the product. In order to ensure the representativeness of the sampling, several parts of the same cross section of the sample can be intercepted to ensure that the total inspection circumference is not less than 35mm. Small samples (round steel with a diameter not greater than 25mm, or square steel with a side length not greater than 20mm) should be tested over the entire periphery. The specific sampling quantity and sampling location shall be specified in the relevant product standards. For fastener products, according to GB/T3098.1-2010 "Mechanical Performance of Fasteners Bolts, Screws and Studs", the selected sample should be about a nominal diameter (1d) from the end of the thread along the axis of the thread The line intercepts a specimen of longitudinal section. When the sample is intercepted, the detection surface must not be heated to change. The edges of the sample shall not be rounded or curled. The sample shall be embedded in plastic or installed in a fixture. Corrosion with 2% to 3% nitric acid alcohol to show the structure of steel.
(2) Determination of decarburized layer
Determination of the total decarburized layer-in the medium carbon steel and low alloy steel, it is distinguished by the relative amount of ferrite and other composition changes. With the aid of a micrometer eyepiece or directly on the frosted glass screen of the microscope, measure the distance from the surface to the point where the tissue and the matrix are indistinguishable. For each sample, in a field of view of the deepest uniform decarburization zone, several measurements (at least 5 times) should be randomly taken, and the average of these measurements is taken as the total decarburized layer depth; and for tool steel, Bearing steel and spring steel measure the deepest decarburized layer as the total decarburized layer depth.
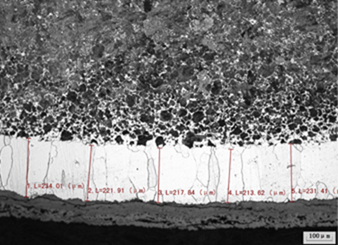
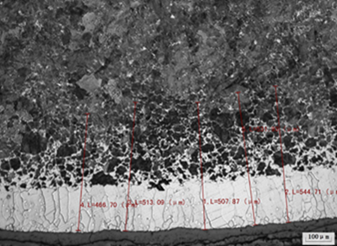
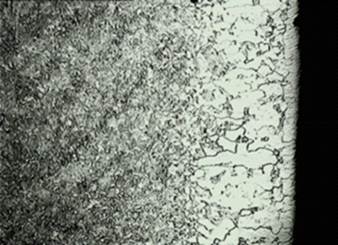
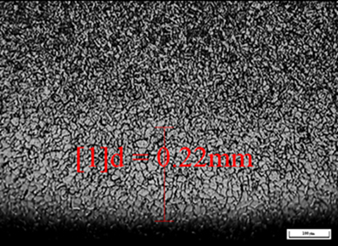
Determination of the fully decarburized layer-the fully decarburized layer refers to the full ferrite structure obtained after decarburization of the sample surface, therefore, the point where cementite or pearlite appears from the surface should be measured during the measurement, or The permeability of the resulting full ferrite structure is the depth of the fully decarburized layer. The choice of magnification depends on the depth of the decarburized layer. If there is no special requirement on the demand side, the magnification is usually 100 times. In general, the decarburized layer of steel with an approximate equilibrium structure depends on the reduction of pearlite (see Figures 1 to 4).

Fig.1 The depth of fully decarburized layer of 60Si2Mn spring steel is 100X

Fig. 2 Total depth of decarburized layer of 65Mn spring steel 100X

Fig. 3 Total decarburized layer depth of 20MnTiB quenched and tempered steel 200X

Fig. 4 Total decarburization depth of 35# quenched and tempered steel 100X
2. Hardness method
Measure the change of microhardness on the cross section, and the depth from the edge of the sample to the hardness reaching a stable value or the hardness specified in the technical conditions is the depth of the decarburized layer. The result of this method is relatively reliable and is a commonly used test method. The decarburized layer measured by hardness method is divided into micro hardness method and Rockwell hardness method.
(1) Micro hardness method
Micro-hardness method This method is to measure the distribution ladder of micro-hardness values in the direction perpendicular to the surface of the cross section of the sample. This method is only suitable for steels with a relatively deep decarburized layer but a small thickness compared to the quenching zone. The microhardness method is not accurate for low carbon steels.
The selection and preparation of the sample are consistent with the metallographic method. Care should be taken to prevent the sample from overheating. In order to reduce the dispersion of the measurement quantity, a large load should be used as much as possible. In principle, this load should be between 0.49-4.9N (50-500gf). The distance between the indentations should be at least 2.5 times the diagonal length of the indentation.
For fastener products, the micro-hardness method is only applicable to threads with a pitch P greater than 1.25mm. Use a 300g load micro-Vickers hardness tester to measure the Vickers hardness at the second point on the thread diameter of the thread cross-section. The value should be equal to or greater than the hardness value at point 1 minus 30 Vickers hardness units. If it is less than 30 Vickers hardness units, it is calculated as the depth of the decarburized layer.
(2) Rockwell hardness method
When measuring with a Rockwell hardness tester, measure directly on the surface of the sample. For products that do not allow a decarburized layer, measure directly on the surface of the original product of the sample. For samples that allow a decarburized layer, measure on the surface where the decarburized layer is allowed to be removed. The Rockwell hardness method determines the Rockwell hardness value HRC according to GB/T230.1-2009. This method is only used to determine whether the product is qualified.
3. Determination of carbon content
It can obtain high measurement accuracy, but it is time-consuming and costly, and is usually only used for research work.
(1) Chemical analysis method
The carbon content of the metal shavings peeled off layer by layer is determined by chemical analysis to determine the depth of the decarburized layer. Using mechanical processing method, strip test strips with a depth of 0.1mm each layer parallel to the surface of the sample, the oxide film should be removed in advance; collect the metal test strips stripped on each layer, according to GB/T20126 -2006 Determine the carbon content. The distance from the surface to the point where the specified value is reached is the depth of the decarburized layer.
(2) Spectral analysis
The flat samples were ground layer by layer, with 0.1mm spacing between each layer, and the carbon spectrum was measured on each layer. Try to make the layer-by-layer spectral spark discharge areas not overlap. The distance from the surface to the point where the carbon content reaches the specified value is the depth of the decarburized layer. Generally only suitable for flat specimens with appropriate dimensions.


KC certification is a mandatory certification system implemented in South Korea for electronic and electrical products, aimed at ensuring that products comply with South Korea\'s safety and electromagnetic compatibility standards. The Korean market has strict quality control over imported goods, and smart rings, as electronic products, must pass KC certification in order to be legally sold in the Korean market.
CE-RED certification is a mandatory compliance requirement of the European Union for wireless devices. For smartwatches with wireless functions such as Bluetooth and Wi Fi, its importance is mainly reflected in the following three aspects.

The Brazilian market has enormous potential, but in order to successfully enter, ANATEL certification is an essential first step. As an authoritative standard certified by the Brazilian Communications Authority, ANATEL certification is not only a guarantee of product quality, but also a legal entry threshold into the Brazilian market.
In the heating or heat preservation process of steel in various hot working procedures, the phenomenon that all or part of the carbon on the steel surface is lost due to the effect of the oxidizing atmosphere is called decarburization.
Get a quote